Galaxy-brain math: part 2, lines are planes are vectors
Recap
In Part 1 we saw how reframing concepts in math can lead to new and interesting ways of seeing the world. Now, we’re going to take that a step further and reframe familiar concepts from geometry.
Mathematical background
In order to fully appreciate what we’re about to see, we will need to begin with some mathematical background. If you know what equivalence classes and cross-products are, you know enough to skip this section.
Geometry: points, lines, rays, planes, spaces
We'll be using the basic language of geometry to describe how images appear on flat surfaces. The internet is filled with introduction to geometry tutorials if you want to brush up. Don't worry too much about fancy theorems, just understand what points, lines, rays, planes and spaces are.
Vectors: direction, magnitude, cross-products. Normal vectors for planes
Vectors have direction and size. Whereas regular numbers can be big or small, vectors also must go in a certain direction. If you've ever given directions to someone, you instinctively understand this. You don't say "walk four city blocks," you say "walk four city blocks towards the east." Otherwise they wouldn't know which way to go.
There are mathematical operations on vectors the same way we have mathematical operations on numbers (like addition, multiplication, and so on). One such operation is called the cross-product, which takes two vectors and produces a third vector that is perpendicular to the other two.
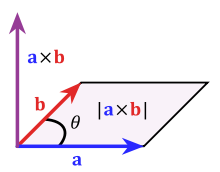
Imagine vectors a and b are lying flat on a table. Then a x b is the cross-product which is pointing straight up. The main thing you need to know about cross-products is that the resulting vector is at a right angle to the other two.
If you have a flat surface (a plane), you can find vectors that are perpendicular to the entire plane. Such vectors are also called normal vectors.
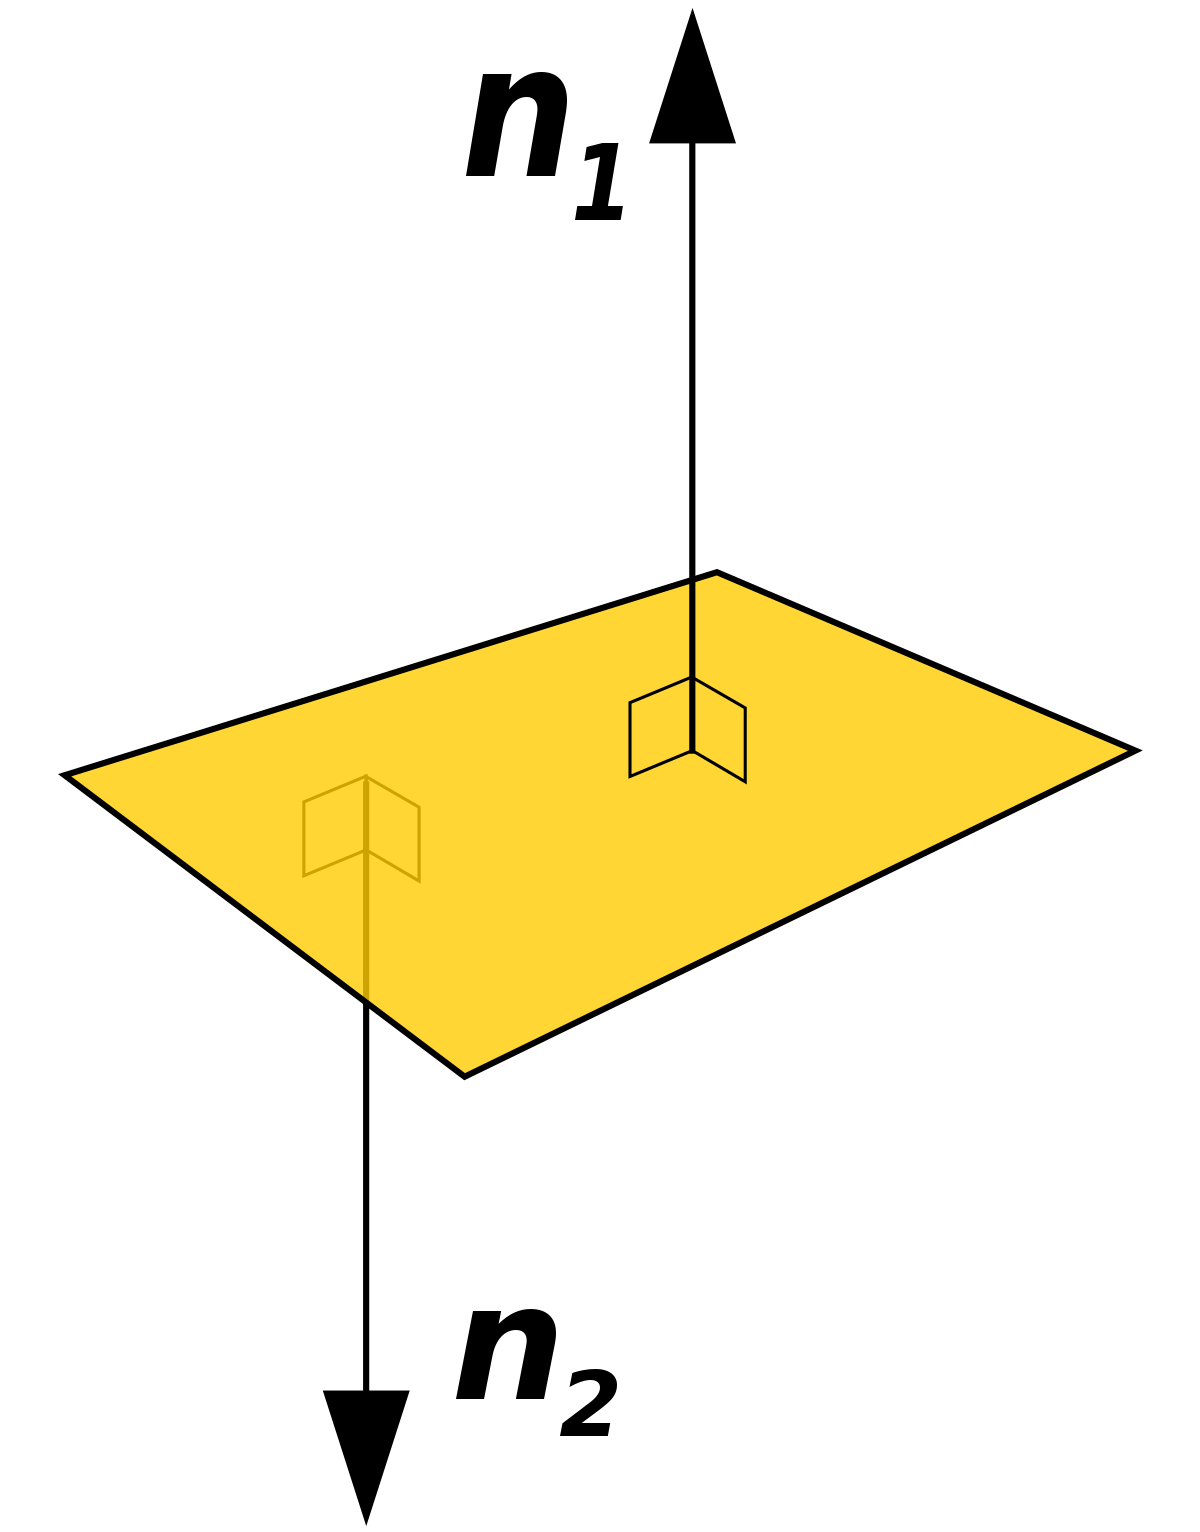
One way to find these normal vectors is by taking the cross-product of two vectors in the plane. Since the two vectors are both in the plane, the cross-product will be perpendicular to both of them, and therefore perpendicular to the plane as a whole.
Lines are planes are vectors
So far we’ve just thought about how individual points on the projective plane work, and how they correspond to rays going from some object in space, through the projective plane, to the camera. Now, we’re going to connect points in the projective plane.
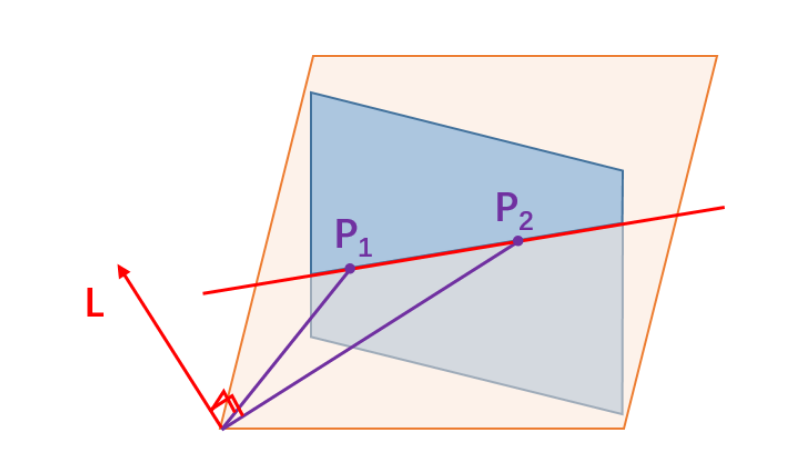
Consider the two red points on the projective plane here, with the camera in blue.
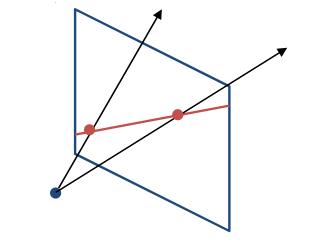
You might remember from geometry hearing something about “two points determine a line.” Turns out that this is mostly just a fancy way of saying that you can take any two points and draw a straight line through them, and that there’s exactly one such straight line you can draw.
These two points in red, however, are special because they’re both in the projective plane. That means both of these red points has a ray associated with it, going from the camera (blue dot) through the projective plane. The ray goes through the projective plane at the red dot. In fact, every single point on the red line has an corresponding ray of light going through it.
We have an infinite number of points on the red line, and therefore an infinite number of rays going from the camera through the red line (one ray per point). If you actually drew all the rays out, you’d start seeing a flat surface consisting of all the rays for that line!
In short: a line in the projective plane corresponds to a plane of rays. If you take a photograph of a straight line, that line came from an entire plane’s worth of rays of light.
Has your head stopped spinning yet? Good, let’s continue.
Remember normal vectors from the mathematical background section? Vectors that go perpendicular to the direction of the plane?
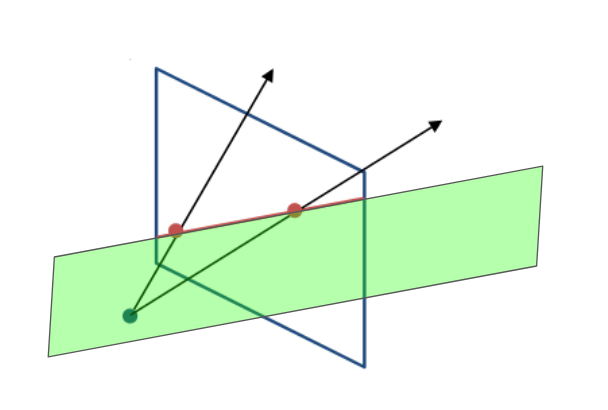
Well, we just figured out that a (red in the diagram above) line in the projective plane corresponds to a (green in the diagram above) plane of rays. Planes have normal vectors, so the plane made of rays of light must have normal vectors. Therefore, if we have a line L in the projective plane, we can find L’s corresponding plane of light rays and therefore find a normal vector to that plane. The normal vector defines L.
To recap:
-
The blue surface is the projective plane.
-
P1 and P2 are points on the projective plane.
-
The red line in the projective plane is the line that connects P1 and P2.
-
Every line in the projective plane is made of a plane full of rays of light. The orange plane consists of all the rays that make up the red line in the projective plane.
-
The red arrow L coming off of the orange plane is a normal vector for the orange plane. The line containing points P1 and P2 can be defined by this normal vector L.
Thus: two (purple) points in the (blue) projective plane form a (red) line in the projective plane which has a corresponding (orange) plane full of rays which has a (red) normal vector. And the (red) vector corresponds to the (red) line.
Whew! What a mouthful. But we’re not done yet.
How do we make a normal vector from a plane?
Let’s start by drawing vectors from the camera to the points on the line (P1 and P2). These two vectors are in purple in the diagram above. You’ll notice that both of these vectors are contained in the orange plane because they’re straight lines from the camera directly to P1 and P2, and that’s exactly how we came up with the plane of light rays idea in the first place.
Now we want a normal vector for the orange plane. Turns out that since we have two purple vectors already in the orange plane, their cross-product (as described in the math background section earlier) is perpendicular to the entire plane of rays.
To recap: we get the (red) normal vector by taking the cross-product of the (purple) vectors to the (purple) points on the (red) line in the (blue) projective plane. If you have two points P1 and P2, then you know your vectors to those points, which give you a cross-product which gives you the vector corresponding to the line connecting those two points. From two points you get the representation of a line, which brings us back to the familiar statement from geometry class: “two points determine a line.”
But why do we have such a convoluted approach to dealing with lines? Why don’t we just do something simpler, like the thing about slopes and intercepts we learned in math class as kids?
We’ll find out in Part 3.